Crow Pose for Beginners: Step-by-Step Guide + Tips to Lift Off with Confidence

Full expression of Crow pose (Bakasana)
Ah yes, Crow pose, Everyones first arm balance…well usually! Mine was actually forearm stand (pincha mayurasana), but that’s a story for a different post (here). Back to crow pose (bakasana), this is usually the first arm balance accessible to us when we begin to get stronger from our yoga practice. If you’re watching others effortlessly in their crow pose wondering “Whoa, how do people actually fly like that without face-planting?” — you’re not alone. Crow can feel like the yoga version of walking a tightrope over a pit of hungry alligators, and rightfully so! The face-planting can happen LOL! But here’s the truth: with the right steps, a little patience, and some belly laughs along the way, you can lift off with confidence!
Mastering crow pose isn’t just about showing off your arm strength (though that’s a pretty cool bonus). It’s about building balance, equinimity, and trust in your own body — kind of like life, really. So whether you’re stepping onto your mat for the first time or finally ready to conquer this tricky arm balance, I’m here to help you take flight — one small, steady step at a time.
Ready to start your crow pose journey? Let’s dive in!

✨ Looking for an all-in-one online yoga studio with guided programs, soulful flows, and real support?
Explore The Recipe here →
What Is Crow Pose (Bakasana)?
Crow pose, or Bakasana in Sanskrit, is one of those classic yoga arm balances that feels like a rite of passage. It’s one of the first arm balances that once mastered, gives us the confidence and body awareness to expand into more. Think of it as your body’s way of saying, “you’ve put in the work, now let me show you how capable I am.” When you fly into this pose, your entire body is involved in making it happen! But there is the illusion that you’re supporting your entire weight on your hands while your knees rest on your upper arms—kind of like perching on a branch, ready to take flight.
Physically, crow pose works wonders: it strengthens your arms, wrists, core + back body while improving your balance and concentration. It’s a full-body workout wrapped in a graceful, bird-like shape. For many practicioners (and those just starting out), it’s a milestone that marks newfound confidence and body awareness.
In this post, I’ll break down how to step into crow pose safely, build the strength and balance you need, and help you fly with confidence — no wings required!
Common Challenges Beginners Face
Crow pose might look simple when others do it, but don’t let that fool you—getting there can be tricky! When all of the pieces finally come together though...it will feel effortless for you too! The journey is the best part, and who you become on the way to your goals is the true gift! If you’re new to Bakasana, you might be facing some of these common hurdles:
1. Fear of Falling or Face-Planting:
It’s totally normal to feel nervous about tipping forward. After all, your hands are holding your whole body! But with practice and the right tips, that fear melts away. Over time you’ll build more strength and confidence and understand how to bail out safely if you need to!
💡 Pro Tip: Worried about falling forward? Place a pillow or yoga block under your face to catch your fall just in case, and build confidence safely. Falling is just part of the flight plan, but you’ll be surprised at how fast your reflexes catch you! REMEMBER, look forward; if you look down you go down.
2. Difficulty Lifting Your Feet Off the Ground:
Lifting your feet can feel like an epic challenge. Many beginners struggle with this, so I’ll show you how to ease into it step-by-step below.
💡 Pro Tip: Lean your weight forward into your fingertips. TRUST that you will catch yourself. Crow is a balancing act and when you lean forward, naturally your feet get lighter like a see-saw. If this doesn’t work, try flexing your feet, sometimes that gives you a little float time without too much risk!
3. Wrist Discomfort or Weakness:
Your wrists are working hard to support you, so some soreness or shakiness is expected. Building wrist strength and using proper hand placement can make a huge difference.
💡 Pro Tip: Support your wrists by making sure to do a solid wrist warm-up before attempting crow pose. Make sure to include both wrist mobility + strengthening movements. This could include; wrist roll outs, wrist push-ups and wrist curls.
✨ Remember: these challenges are part of the journey, not signs you’re doing it wrong. With patience and practice, you’ll get there!
Step-by-Step Instructions to Get Into Crow Pose
Ready to give crow pose a try? Let’s break it down step-by-step, so you feel confident and supported as you lift off:
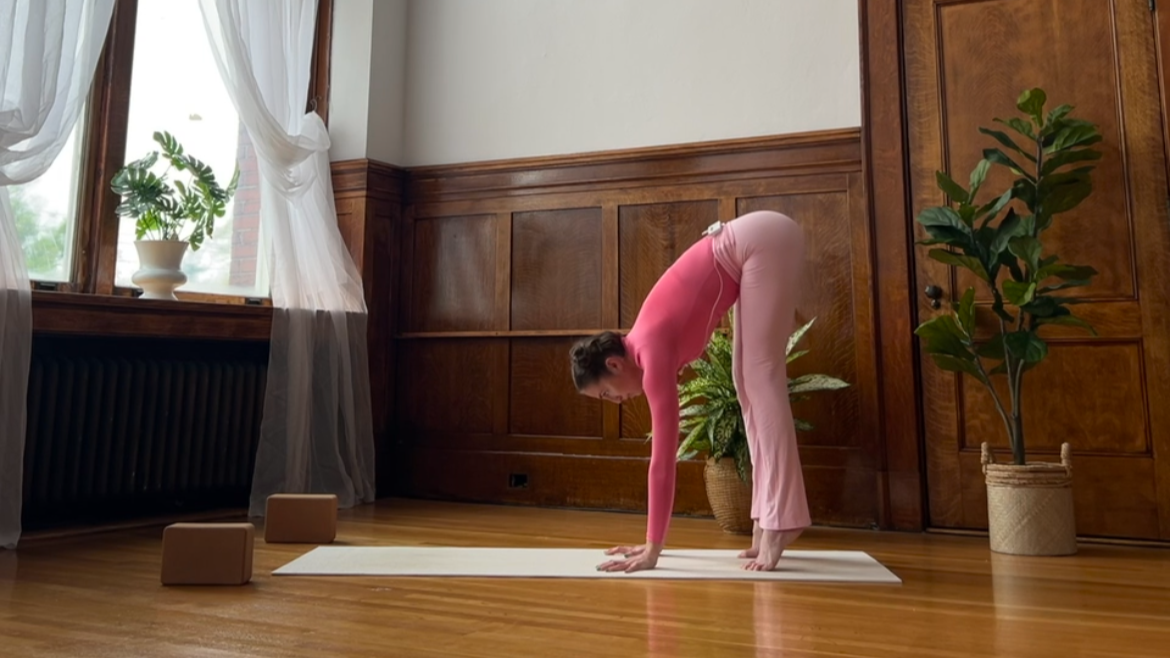
1. Start in Forward Fold: When I practice and teach crow, I do it a little differently. I like to start with my hips HIGH, doing this sets you up for success. Why? Starting with your hips high means you can fly in from high up instead of using your wrists and shoulder strength to press you up. Starting with hips higher allows you to engage your core and use full body strength instead of just relying on wrists and shoulders. I find this way to be more effective, at first it may feel a bit scary but once it clicks, you will have a STRONG Crow, guaranteed. SO, Start in a forward fold, hands planted shoulder width apart about 1 foot in front of your feet. If you need to bend your legs a bit to get your hands flat on the ground that is OK!
2. Plant Your Hands Firmly: Spread your fingers wide for a strong base. Imagine each fingertip as a little creature pressing firmly down into your mat. Your fingertips and heels of your palms are your steering wheel. If you go too far forward, press into fingertips and if you are too far back, press into the heels of your palms. Feel your whole hand on the mat.
3. Engage Your Core: Look forward, inhale, and as you exhale press into the ground to round your spine (think cat pose). This will hollow your core; absorb your ribs into your belly and keep this core engagement (think knee to nose pose/tiger curl). This is your secret power for keeping your crow pose feeling light.
4. Position Your Knees: Begin to gently rest your knees on the backs of your upper arms, as close to your armpits as feels comfortable. Keep pressing the ground away as you do this (arms should feel like they do in a strong plank). At this point, your core is doing more of the work, in fact it’s all core and there shouldn’t be much pressure on your arms.

5. Shift Your Weight Forward: First, LOOK FORWARD NOT DOWN (Remember, you look down, you go down). Slowly shift your body weight forward into your fingertips, bending your elbows a little (think chataranga arms) keep lifting your hips higher, rounding through your core and bringing your shoulders over your wrists.

6. Lift Off: Stay leaning forward then start by lifting one foot off the ground, keeping your gaze forward. When you feel steady, lift the other foot, or just do one at a time until you feel confident. You might try flexing both feet at the same time, sometimes this is a hack to engage the backs of your legs and find easier float time. If both feet lift, squeeze your heels to your bum and touch your big toes together.
7. Find Your Balance: Keep your core engaged, press out of your fingertips, wrap your elbows back, breathe deeply, and focus your gaze a few feet ahead on the floor to help steady yourself.

8. Hold and Breathe: Stay here for a few breaths, enjoying the feeling of flying. When you’re ready, gently lower your feet back down.

🧘♀️ Want more support building your crow pose?
Inside The Recipe, my online yoga studio, you’ll find a crow-focused class that walks you through this pose (and other arm balances!) in real time — with guidance, modifications, and strength-building to help you feel confident from the inside out. It’s all there waiting for you whenever you’re ready to fly. 🤍
Remember, it’s okay to come down and try again — each attempt builds your strength and confidence!
Your Crow Pose Journey Starts Now!
If you made it this far, I hope you’re feeling empowered, supported, and maybe even a little excited to get upside down. Crow pose can be humbling, playful, and wildly rewarding all at once — and like anything meaningful, it takes time and practice.
You don’t need to be perfect to get started. You just need a bit of courage, a sense of humor, and the willingness to try again (and again). Whether you’re just lifting one toe or soaring for five breaths, every effort counts. I’m so proud of you!
If you’re craving more guidance and want to keep building strength and confidence on your mat, I’d love to support you inside The Recipe, my online yoga studio. You’ll find classes that meet you exactly where you are — from skill-building flows to full programs that walk you step-by-step through poses just like this one. In fact I have a class centered entirely around learning crow pose!
✨ Now go take flight — and remember, the fall is just part of the magic.
You’ve got this.
xx Jess
Your recipe for strength, flexibility, breath + inner connection. Get anytime access to our growing collection of over 100 classes, ALL programs, and exclusive content. Yoga, meditation, strength + more.
Your recipe for strength, flexibility, breath + inner connection. Get anytime access to our growing collection of over 100 classes, ALL programs, and exclusive content. Yoga, meditation, strength + more.
Like this post? Pin it to save for later!