How to Master Chinstand: Tips, Drills & Confidence Builders
If you’ve ever watched someone float effortlessly into chinstand and thought, "There’s no way I could ever do that,"—you’re not alone, that was absolutely ME for YEARS!!! Chinstand (Ganda Bherundasana) is one of those bold, beautiful poses that looks impossible… until you break it down. Bite sized steps with consistency will have you suprising yourself with the magic of chinstand. This is truly a pose I thought would never be accessible to me, until I learned the right way to approach it and shocked myself in the best way haha!
The truth? You don’t need circus-level strength or extreme flexibility to start working toward your chinstand—you just need the right foundation, a few key drills, and the confidence to begin.
In this post, we’ll explore how to build strength, stability, and trust in your body so chinstand becomes not only possible, but empowering. Whether you’re a curious beginner or an experienced practicioner ready to level up, this post is here to help you approach chinstand with clarity and courage.
Let’s flow into it together!
What Is Chinstand in Yoga?
Chinstand, also known by its Sanskrit name Ganda Bherundasana, is a more advanced yoga pose that combines core strength, backbending, and balance into one powerful expression. In this pose, your body is supported by your chest, chin, hands, and arms—while your legs extend above you, floating to the sky like one giant wing.
It’s a dramatic shape that often turns heads, but chinstand is more than just a show-stopper. This pose:
Strengthens your shoulders, triceps, and entire back body
Opens your chest and hip flexors
Improves spinal strength, mobility and body awareness
Builds confidence and trust in your practice
Although it’s typically considered an advanced yoga pose, chinstand is accessible to anyone willing to build strength, body intelligence, and patience over time. Like anything, it works if you work for it.
Whether you’re just starting to explore chinstand or working toward liftoff, this pose invites you to find grace in the effort—and to approach your edge with both courage and care. This isn’t a pose you can force (hello nervous system), be open to the element of surprise. When your body is ready you’ll fly up.
Is Chinstand Safe for Beginners?
Chinstand might look intimidating, but here’s the good news: you don’t need to be an advanced practitioner to begin working toward it. With the right preparation, support, and mindset, even beginners can safely explore the foundations of chinstand.
That said, chinstand is not a pose to rush into. It requires shoulder strength, spinal awareness, and trust in your body—all of which can be developed over time with accessible drills and transitional poses.
If you're new to chinstand or yoga inversions in general, here are a few tips to keep it safe and empowering:
Use props. Place yoga blocks under your shoulders or a folded blanket under your chin for extra support.
Warm up your spine. Gentle backbends like cobra, sphinx, upward dog + sunbird bows are great ways to prepare your body.
Engage your core and legs. Even though your chin touches down, the pose isn’t about collapsing—it’s about lifting actively from within.
Start with one leg. Practice lifting one leg at a time or pulling one knee to chest before attempting both.
Never force it. If you feel strain in your neck or lower back, pause and reassess. Strength develops over time—not overnight. Pain is an indicator that we are not yet ready. Patience is our friend here.
Chinstand is about progress, not perfection. When approached with patience and proper technique, it becomes a pose of deep empowerment—not danger.
Prep Poses & Drills to Build Toward Chinstand
Before you fly, you’ve got to lay the groundwork. Chinstand requires a unique combo of upper body strength, spinal mobility, core control, and courage—so prepping your body is key. These poses and drills will help you build the strength and confidence needed to approach chinstand safely and skillfully.
Here are my go-to prep poses and movements (most of which are woven into my classes inside my online studio -The Recipe):
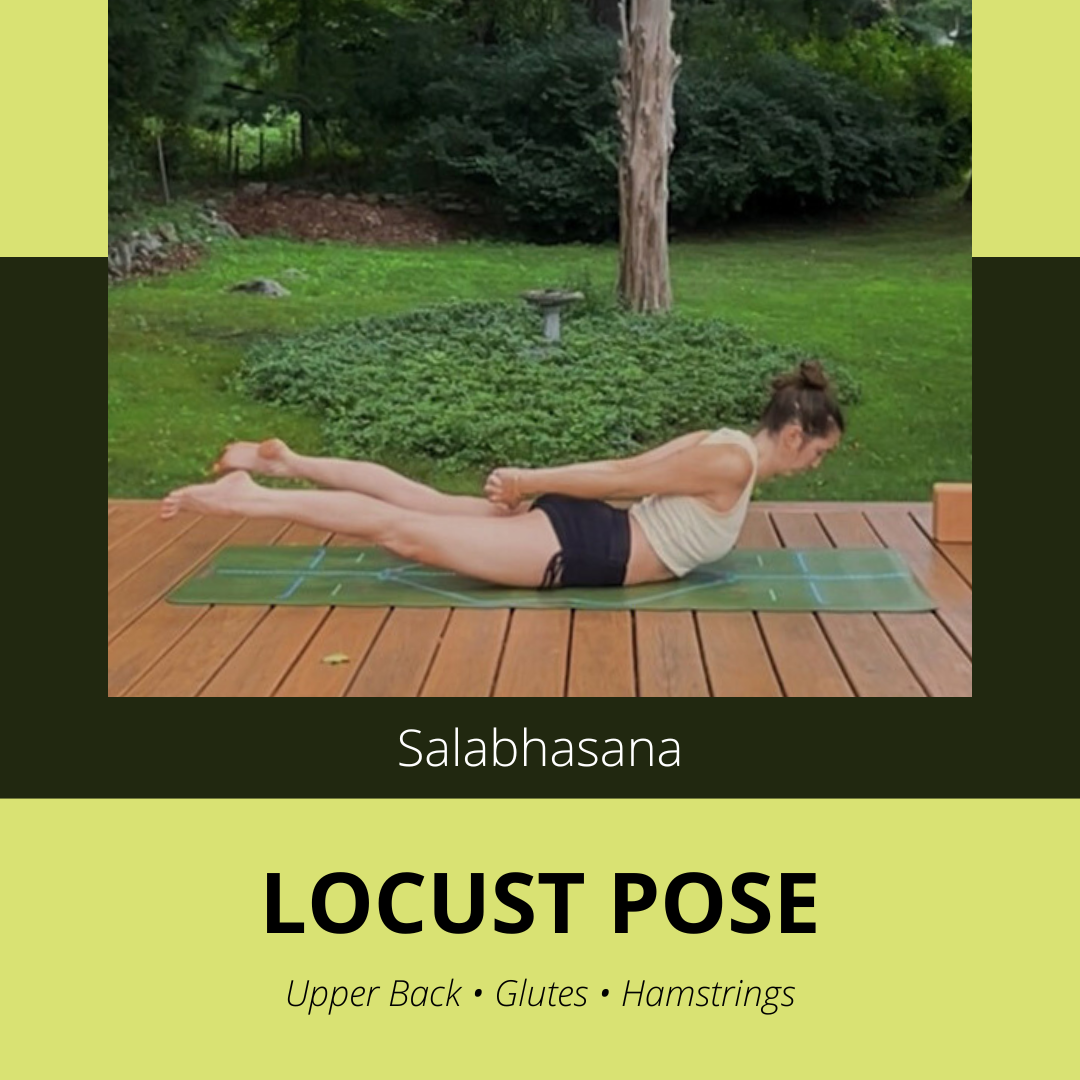
1. Locust Pose (Salabhasana)
Builds posterior chain strength (upper back, glutes, hamstrings)
Teaches the feeling of lifting the chest and legs without straining the neck
2. Chaturanga Hold
Essential for arm and shoulder strength
Try holding for 10–20 seconds, keeping elbows hugged in and chest lifted (if this is too much at the beginning, place your knees on the ground and start there).

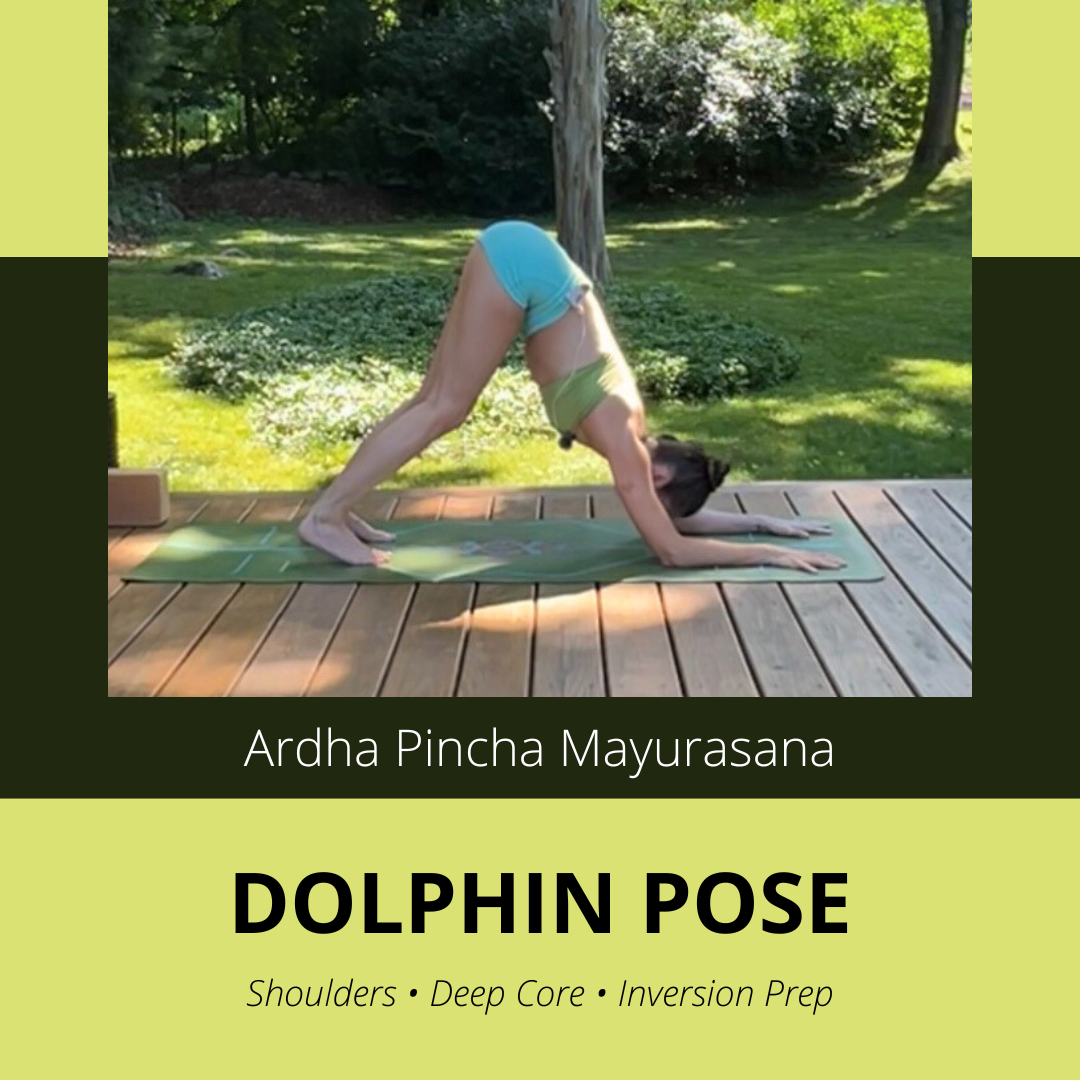
3. Forearm Plank + Dolphin Push-Ups
Strengthens your shoulders, core, and upper back while improving control
Great for training scapular stability—crucial for chinstand
Start with regular forearm plank, progress to dolphin holds (shown below), progress to dolphin pushups (keeping shoulders elevated, look forward and try to tap your chin to the floor, then return to dolphin. 3-5 reps to start).
4. Lizard Lunge + Twists
Opens hip flexors and takes you into spinal extension in a less intense way
Prepares the lower body for the backbend + heart opening elements of chinstand

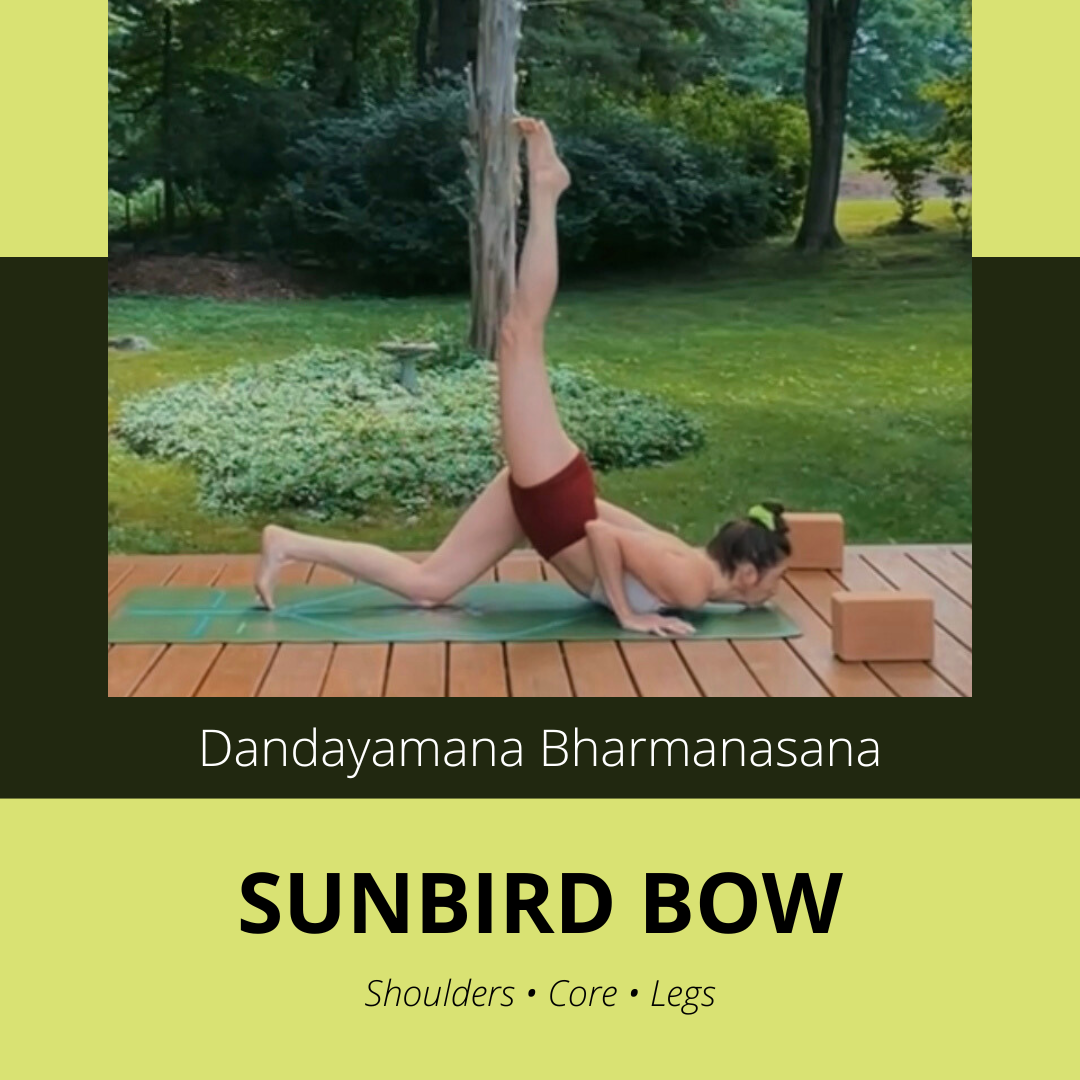
5. Sunbird bows
Begin in tabletop
Lift one leg to hip height
Hug your elbows tightly into your ribcage (tighter than chaturange) and lower your chest to the ground, lifter leg stays high. Elbows tether back, core strong, legs activated and lifting upward.
🌟 Want to follow a class that builds these skills from the ground up?
Inside The Recipe, my online yoga studio, I’ve created full-length flows and targeted drills that strengthen your shoulders, activate your core, and prepare your spine to move into poses like chinstand—step by step.
— Whether you’re working on your first inversion or refining advanced transitions, The Recipe gives you the tools, guidance, and community to grow your practice in a way that feels strong, supported, and sustainable. More details + sign up HERE
How to Enter Chinstand Step-by-Step
Approaching chinstand (Ganda Bherundasana) with intention and awareness is key to both safety and success. This isn’t about flinging yourself into a backbend—it’s about moving with control, strength, and breath.
Here’s a simple, beginner-friendly step-by-step guide to entering chinstand:
Step 1: Warm Up Thoroughly
Before you even think about lifting your legs…remember, PATIENCE is our friend, spend time warming your spine, shoulders, and wrists. Backbends, planks, and shoulder openers are a must. You can use the poses in the previous section to warm up!
Safety Tips:
Use props like blocks or blankets as needed (I created a post on my favorite props for a home practice HERE).
Never let your neck take the full load—your arms and shoulders should do the heavy lifting.
Work on progressions consistently, and let strength build over time.
Step 2: LOWER DOWN
From table top. Lift one leg up to hip height, look forward and lower your chest to the ground or blocks.
💡 Pro tip: Make sure your bottom toes are tucked! This allows you to push off the ground to get up.
🌱 Progression: When this starts to feel easy, you can start from 3-legged down dog instead of table top!
Step 3: Lift off
Lift your bottom knee up off the ground maybe even hopping your back foot in a bit closer. Keep looking forward as you either hover your bottom leg off the ground with control or pull your bottom knee into your chest. From here, as long as you feel stable, begin to float your bottom leg up to meet the top leg.
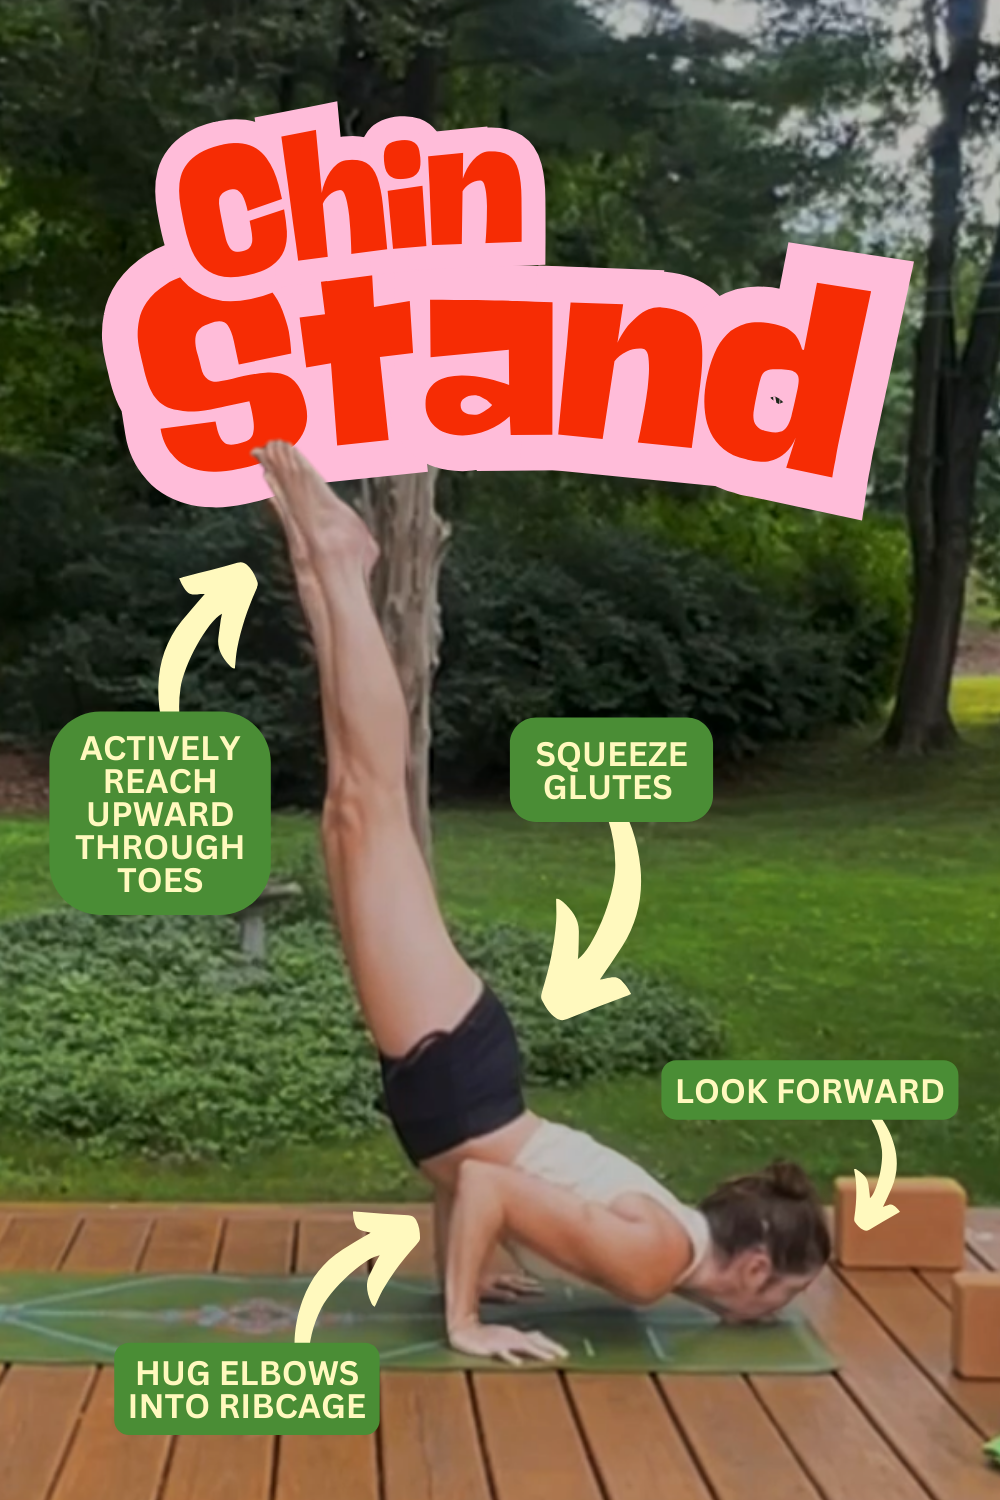
Step 2: MICRO-Adjust
Once you’re up, point or spread your toes to activate your legs and imagine them reaching upward, taking any pressure out of your low back. Over time sink you’re chest closer to the ground.
Step-by-step how to chinstand graphic:
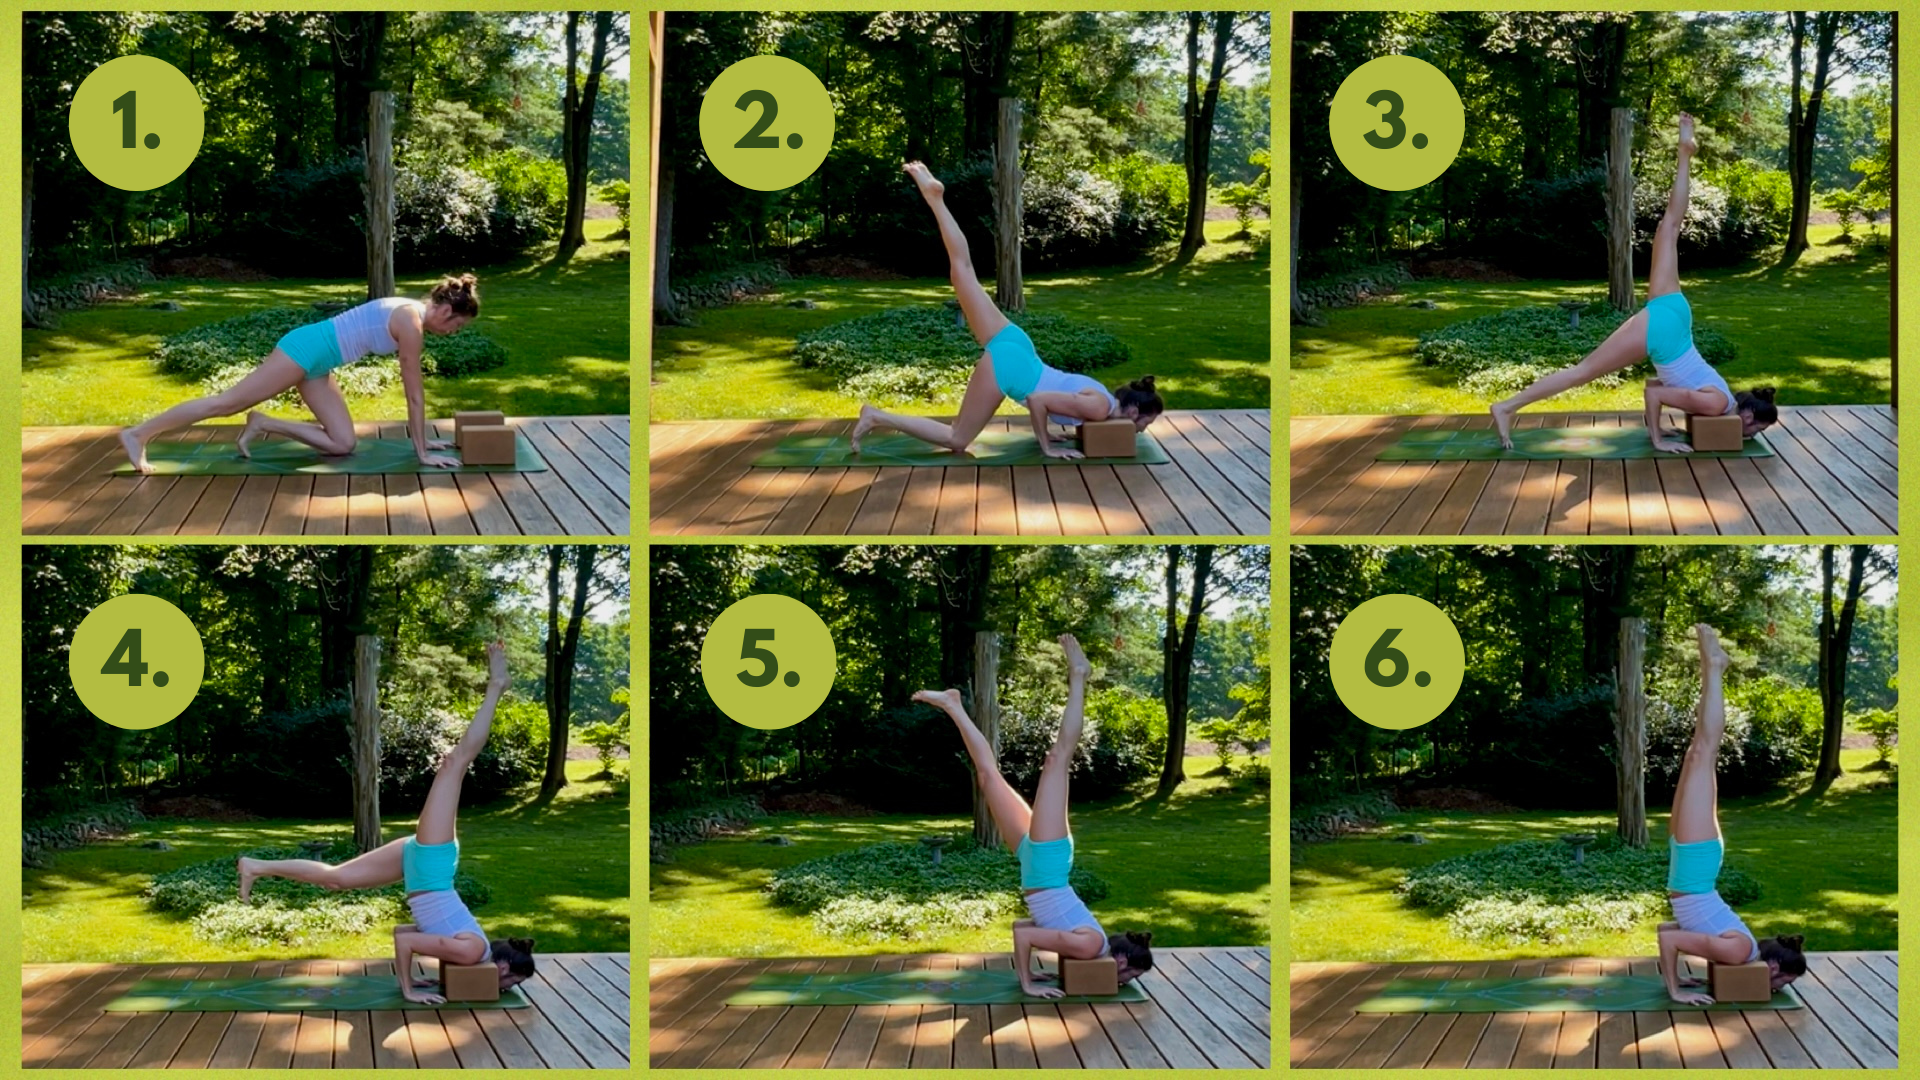
How to chinstand, step-by-step. Here I am using blocks to support my shoulders, making it easier to float up.
Common Chinstand Mistakes (and How to Fix Them)
Chinstand can feel like a delicate dance between strength, grace, and alignment—and when even one piece is off, it can feel wobbly, frustrating, or unsafe. The good news? Most issues stem from a few common habits that are totally fixable with the right awareness and drills.
I got you. Let’s break them down:
🚫 Mistake #1: Collapsing into your Neck
The Problem: Instead of spreading the weight through the arms and chest, all the pressure ends up in the chin and neck. The chin is really only a balance point, not much weight if any is being placed there.
Fix It:
Strengthen your upper back and triceps through chaturanga holds and dolphin push-ups
Use a folded blanket under your chin or blocks under your shoulders until you feel strong enough to hover
Think lift the heart, not drop the head
🚫 Mistake #2: Too Much (or Too Little) Momentum
The Problem: Some practitioners try to muscle their way into chinstand by kicking up hard — while others hesitate so much they never get off the ground. Both extremes can throw off your balance, alignment, and confidence.
Fix It:
Focus on controlled entry — not speed. Use small, intentional lifts rather than big kicks.
Practice lifting one leg at a time, slowly and with breath.
Get comfortable in your sunbird bows to familiarize yourself with how the shape feels
Think of it as a glide, not a launch.
🚫 Mistake #3: Lack of Warm-Up or Prep
The Problem: Jumping straight into chinstand without preparing the spine and shoulders can cause strain or make the pose feel impossible. Backbends can activate your sympathetic or fight or flight response. Without the proper warm-up your body might not feel safe enough for the posture and block you from entry.
Fix It:
Always prep with gentle backbends, core strengthing, shoulder openers, and hip mobility drills
Incorporate spinal waves and cobra flows to warm the body fully
Treat chinstand as part of a flow, not an isolated shape
🚫 Mistake #4: Forgetting to Breathe
The Problem: Holding our breath creates tension, especially in the neck and shoulders.
Fix It:
Breathe smoothly through your nose
If you can’t maintain the pose with a calm breath, come down and work more on drills until you are able to go up with your breath still flowing.
Chinstand is a pose that teaches patience, presence, and power. Every attempt, wobble, and adjustment builds the strength you need—physically and mentally.
Ready to Take Chinstand Further? Flow with Me Inside The Recipe
Peek Inside The Recipe Here
If chinstand has sparked something in you — a desire to feel stronger, more aligned, more confident in your practice — you don’t have to go it alone.
Inside The Recipe, my all-access online yoga studio, you’ll find full-length flows, strength-building progressions, and targeted drills that support you every step of the way. That includes a class specifically designed to help you explore chinstand safely and powerfully.
Whether you’re just beginning your journey or refining advanced shapes, The Recipe gives you everything you need to build strength, flexibility, and flow — from the inside out.
✨ Your membership includes:
Unlimited access to my chinstand-focused class + 100+ hours of on-demand yoga videos
Targeted programs like the Foundational Strength Series and 30-Day Handstand Conditioning
Breathwork, mindset tools, and a supportive space to grow at your own pace
New classes added regularly to keep your practice fresh and inspired
💻 Practice anytime, anywhere — and take your yoga to the next level with guidance that’s soulful, strong, and rooted in love.
👉 Click here to join The Recipe and start flowing with me today.

Your recipe for strength, flexibility, breath + inner connection. Get anytime access to our growing collection of over 100 classes, ALL programs, and exclusive content. Yoga, meditation, strength + more.
Your recipe for strength, flexibility, breath + inner connection. Get anytime access to our growing collection of over 100 classes, ALL programs, and exclusive content. Yoga, meditation, strength + more.
Like this post? Pin it for later!
