Flying Splits Pose for Beginners: Step-by-Step Guide to Koundinyasana II
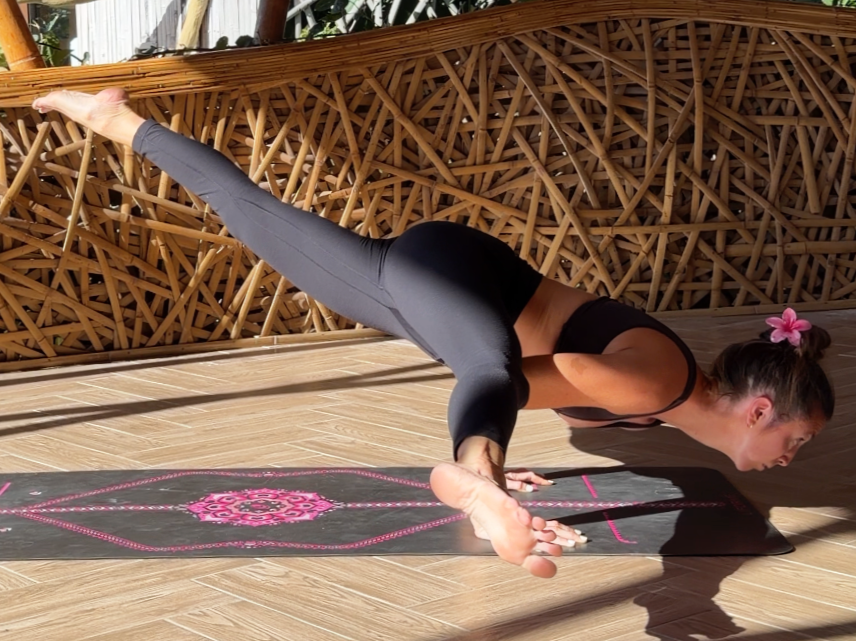
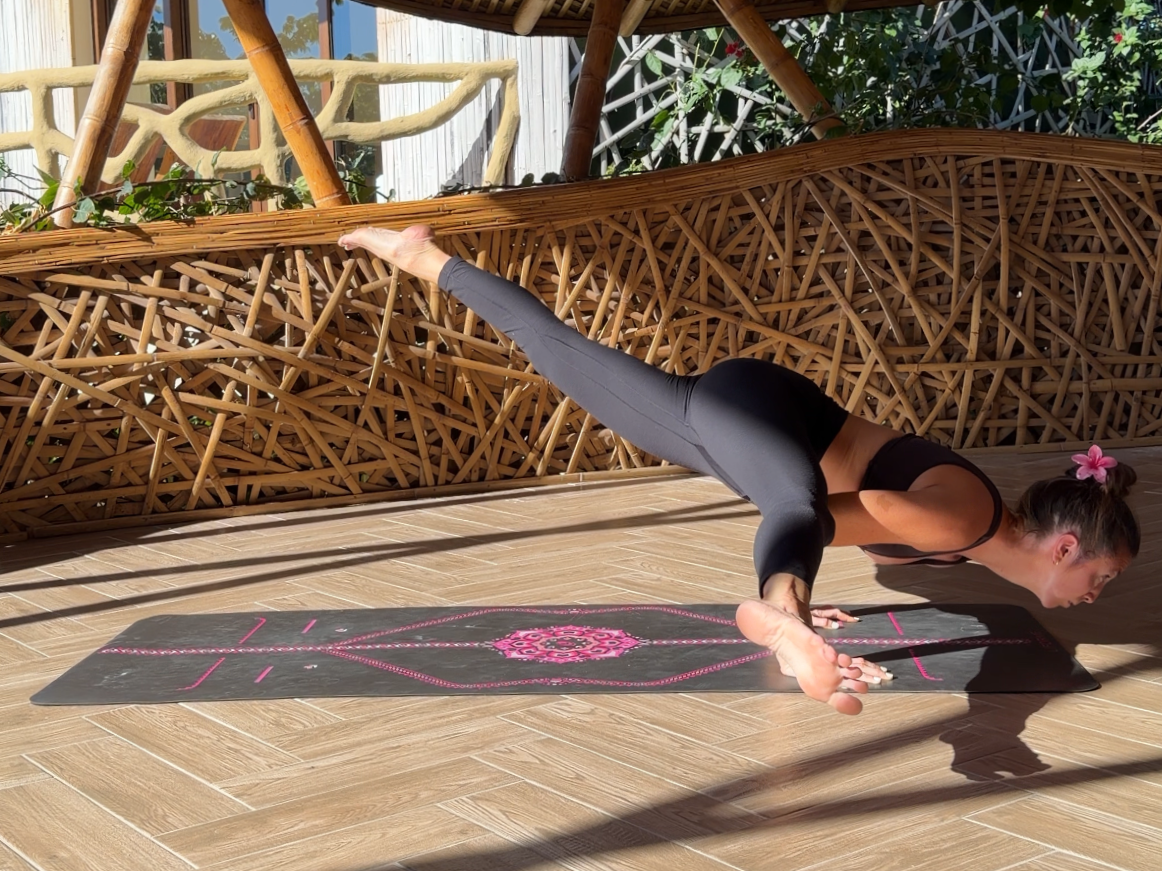
Full expression of Flying Splits (Koundinyasana II)
At first glance, Flying Splits (Koundinyasana II) can look almost gravity-defying; a long, powerful split floating on the arms with one leg reaching forward and the other extending behind you. I’m not going to lie, it truly FEELS as graceful as it looks! You genuinely feel like you are flying! Sometimes (all the time) I feel like the yoga sutras mentioned powers at the end of the book only for the joke to be on us because I believe certain asanas give us glimpses of these said mystical powers AKA FLIGHT!
Despite its impressive appearance, this pose isn’t just about strength. Like many arm balances, Flying Splits becomes much more accessible when you begin to understand the mechanics behind it, like how to create the lift, how to bind, where to shift your weight and how your legs and core work together to create lightness.
Flying Splits builds on many of the same principles found in other arm balances, such as Crow and Side Crow, making it a natural next step for practitioners who enjoy exploring strength, balance, and the art of lift. Koundinyasina II is also a jump off point for fun and challenging transitions, for example Koundinyasina II into chinstand is one of my FAVORITES! More about chin stand HERE.
Ready to explore flying Splits with more clarity, confidence, and curiosity? Lets dive in!

✨ Looking for an all-in-one online yoga studio with guided programs, soulful flows, and real support? Explore The Recipe here →
What is Flying Splits (Koundinyasana II)?
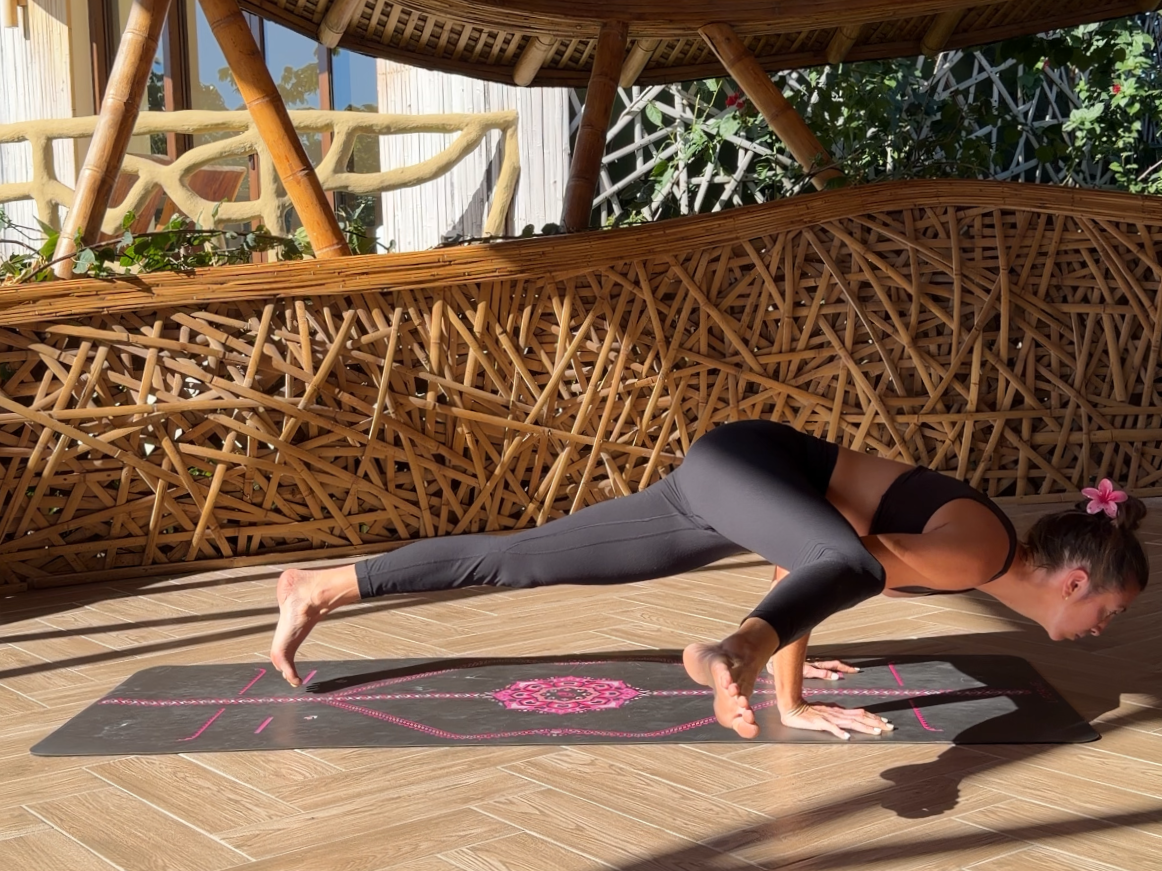
Flying Splits, traditionally called Eka Pada Koundinyasana II, is an arm balance where your torso leans forward over your arms while your legs extend in opposite directions. In the pose, your front thigh connects high onto the back of your upper arm while your back leg reaches long behind you. As your weight shifts forward into your hands and fingertips, your front leg begins to extend forward while your back leg lifts and lengthens behind you, creating the appearance of a split suspended in midair.
What makes Flying Splits especially interesting is that it combines several different elements of the practice into one posture. You’re working with a forward weight shift into your hands, a strong sense of core engagement to help stabilize the shape and your posterior chain (extensor muscles) to give the shape lift! Your back body is the sneaky hero of this pose and this KEY is often overlooked!
While the final pose may look very advanced, the mechanics behind it often become more approachable once you begin to understand how the pieces work together. In many ways, Flying Splits builds on foundations you may already recognize from other arm balances like Crow Pose and Side Crow, where learning to trust your hands and organize your weight is key.
Common Challenges Beginners Face in Flying Splits
Flying Splits can feel confusing the first time you try it. The pose requires a combination of a weight shift, leg activation, core + posterior chain activation (this one is usually forgotten about!) and if even one of those pieces is missing the posture can feel nearly impossible. But fear not! I am here to help you put the puzzle pieces together and you will be cruising into your Flying Splits (Koundinyasana II) in no time. Here are three of the most common challenges practitioners run into when working into the pose, and a few ways you can begin working through them.
1. Your Front Leg Keeps Sliding Off Your Arm
One of the most common frustrations is getting into position but feeling like your front leg simply won’t stay connected to your arm (especially in HOT YOGA, ya feel me?!).
This usually happens when your thigh is placed too low on your upper arm. When the connection point is low, your leg has very little support and will naturally slide off as you begin shifting your weight forward.
💡 Pro Tip: When you connect your upper thigh to your outer arm focus on bringing your thigh as high as possible onto the back of your upper arm almost up into your armpit! It usually will land somewhere lower above the elbow but the more exaggerated we can make this the better chances we have of it staying higher! The higher your leg connects, the more stable the structure of the pose becomes.
You can also think about hugging your inner thigh firmly onto your arm, which helps create the bind needed to stay connected. Binding is a powerful tool when it comes to arm balances.
2. Your Back Leg Won’t Lift
Another very common experience is feeling like your back leg is glued to the floor. Often this isn’t because of strength alone. In many cases, your body simply hasn’t shifted far enough forward into the hands yet. If your weight stays too far back, your back leg has no room to lift. Think of it like a seesaw, the more you move forward and even a little bit downward in the beginning phase the lighter your back leg will get. Weight in your fingertips not the heel of your palm!
💡 Pro Tip: Try shifting your chest much more forward than feels intuitive while keeping your gaze forward on the mat. The action isn’t dropping DOWN it is FORWARD.
At the same time, actively reach your back leg long behind you and squeeze muscle to skin to bone. The more energy you send through the back leg, the lighter it will begin to feel.
3. The Pose Feels Like Pure Arm Strength
At first glance, Flying Splits looks like it requires a huge amount of upper-body strength. While the arms and shoulders certainly work hard, the pose becomes much lighter when your core, back body and legs participate fully.
If your core isn’t engaged or your legs feel passive, your arms end up carrying far more weight than they need to.
💡 Pro Tip: Think about cobra pose in your back body when you’re moving forward into it. Even though your body is moving forward and down, the muscles in your blackbody ignite and create a supportive lift.
At the same time, keep both legs active and reaching in opposite directions. Spreading your toes is KEY for this. When your legs extend with intention, they help distribute the effort across the entire body instead of dumping all the work into your arms.
Step-by-Step INSTRUCTIONS to get into Flying Splits
Ready to give Flying Splits pose a try? Let’s break it down step-by-step, so you feel confident and supported as you lift off.
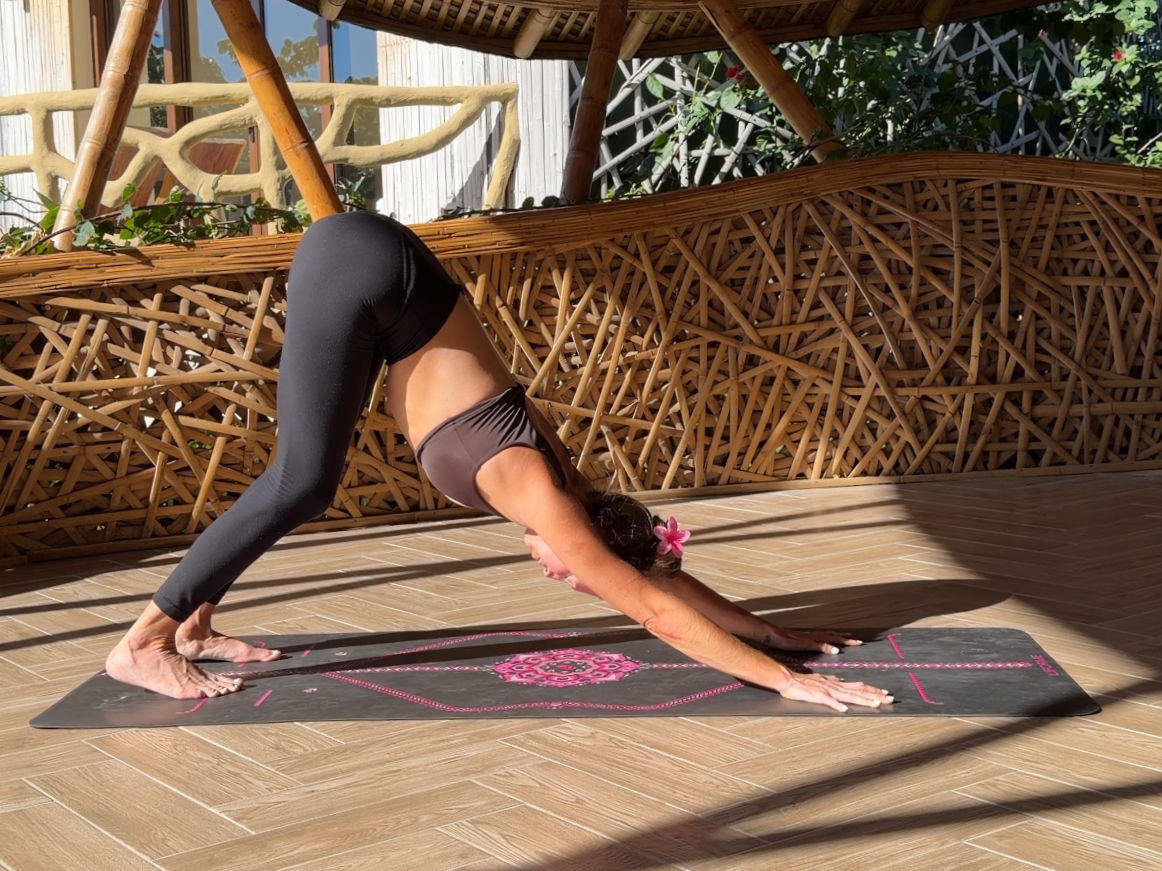
1. Start in Downward Dog: My favorite way to enter Flying Splits (Eka Pada Koundinyasana II) is from Downward Dog. Starting here keeps your hips high and helps you organize the forward momentum needed for the pose. When hips are high it is a flying in action instead of a fight against gravity. Begin in Downward Dog with your hands firmly rooted and your hips lifting high.
2. Lift one leg high into Three-Legged Dog:, Reach your heel up toward the sky. Keep your lifted leg active by spreading your toes and keep your hip closed, pinky toes toward the floor.

3. Begin to Shift Forward and Activate Your Core: Come onto the tippy toes of your standing foot and begin drawing your lifted knee tightly into your chest. Allow your spine to round slightly as you curl the leg in. As you round pull your ribs up into you activating your core and helping to prepare your body for the arm balance.
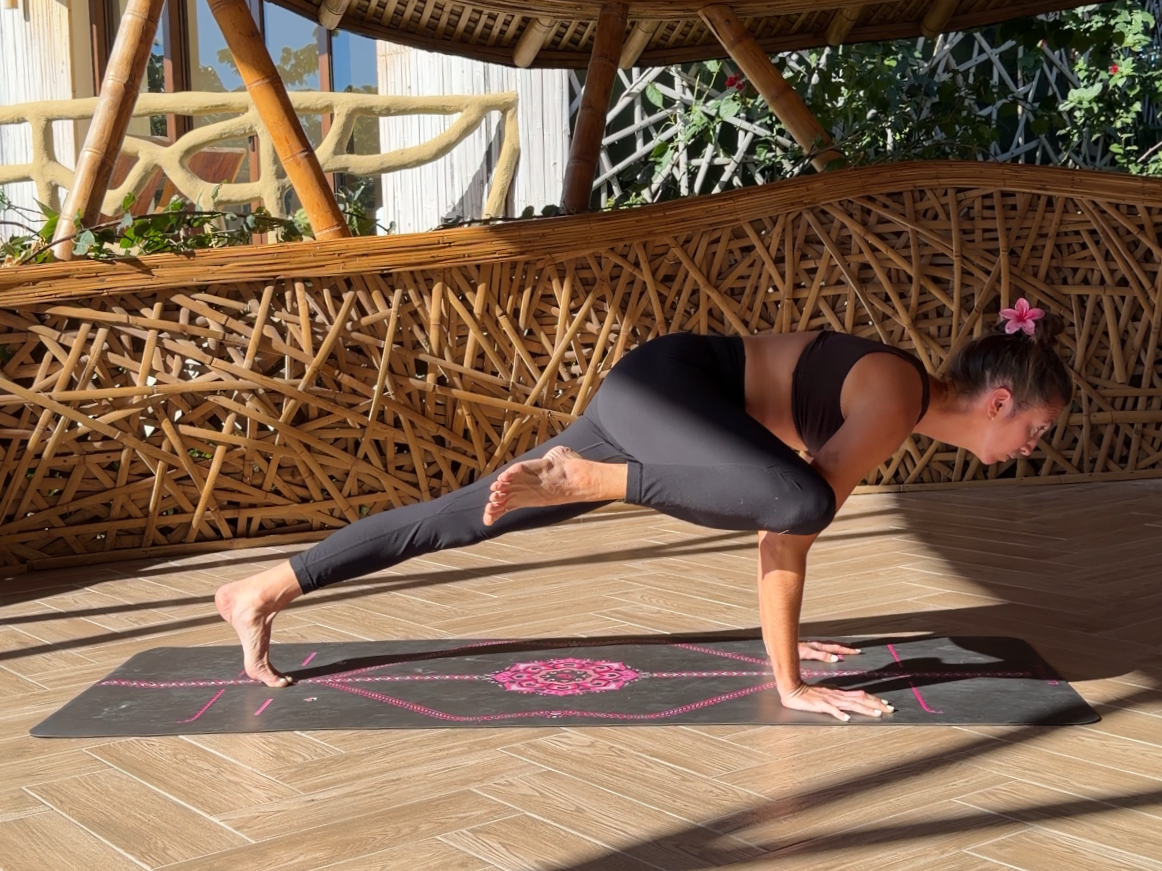
4. Place Your Knee High on Your Arm: From this compact position, continue shifting forward until you bring your knee toward your same-side upper arm. Aim your knee toward your armpit, but anywhere it lands above the elbow is a great place to start. The higher your leg lands on your arm, the more stable the pose will feel. Continue to keep your hips high + ribs curled in! Don’t let them drop and you shift forward!
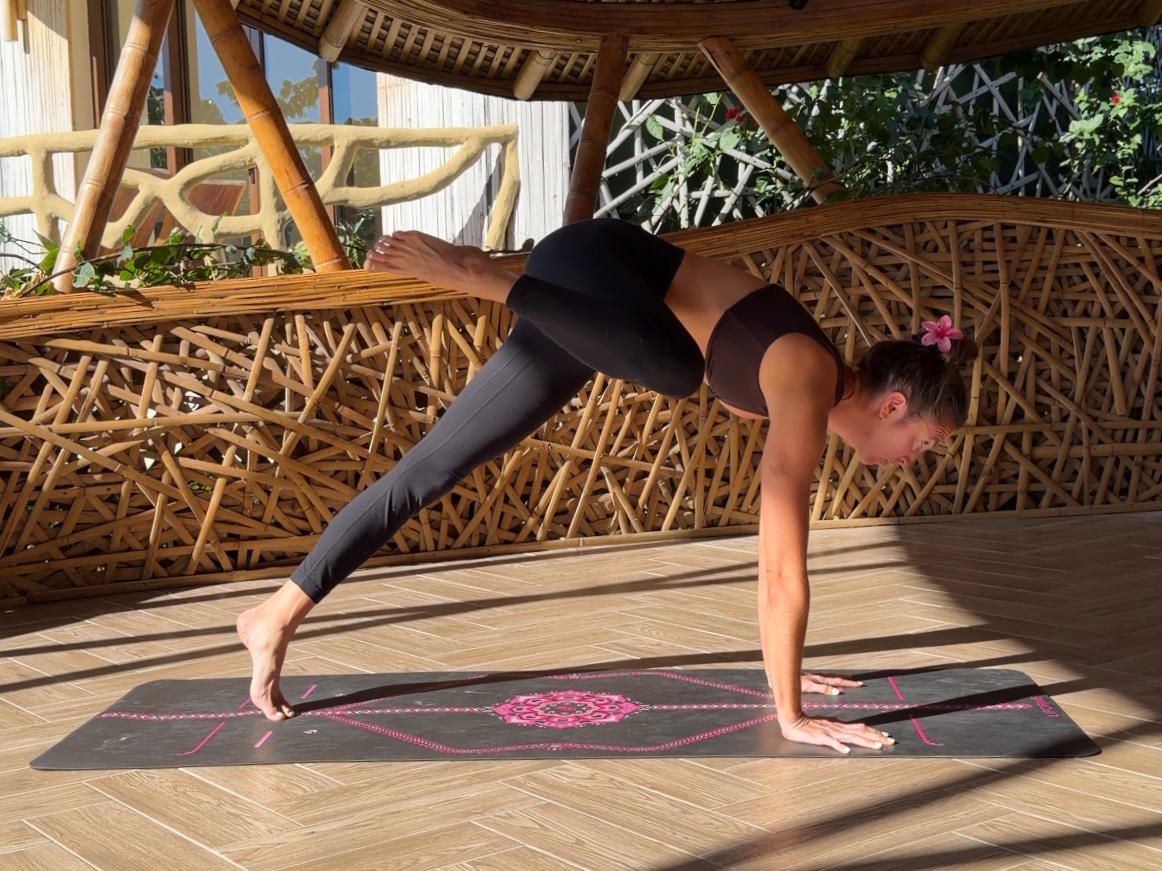
5. Shift Your Weight Forward: Look forward with your eyes and begin shifting your weight into your hands. Think about pressing firmly into your fingertips. If you look down, YOU GO DOWN! Keep your gaze forward and glide the entire shape forward. Trust it.
6. Bend Your Elbows and Keep Moving Forward: As you continue shifting forward, begin bending your elbows toward about 90 degrees, similar to the arm position in Chaturanga. Keep your weight rooted in your fingertips and resist the urge to stop your forward momentum. The pose requires a continuous forward shift, so keep moving your chest ahead of your wrists as your elbows bend. Think forward and up forward and up with your heart and your elbows bend down. Get comfortable with the opposite actions happening in your body.
💡 Pro Tip: You can make a shelf with your opposite elbow and drop your opposite hip onto it as you slide forward to make this easier. This is great for beginners still building strength..
7. Lift Your Back Leg: As your weight continues to move forward, begin pressing strongly off your back toes. Spread your back toes and engage your back glute as you float your leg upward behind you. Think about sending energy through the back leg as it rises. There is a quintessential see saw action here when you first start to learn this posture, keeping your heart as open as possible the more it drops down the more your leg can lift up!
8. Extend Your Front Leg: Once your back leg lifts, begin extending your front leg forward. You can think of this as a bind between your leg and your arm! Use the bound connection by pressing your leg into your arm and your arm back into your leg. This connection helps stabilize the pose as the front leg lengthens. (Sometimes extending your front leg first can encourage your weight forward and this may help lift your back leg; try both and see what works for you!)
9. Refine the Shape: From here, refine the posture. Think about creating a gentle cobra-like action through your back body. Your heart lifts slightly forward while your back heel continues reaching up. This subtle lift through the chest helps bring lightness into the pose.
And there you are, ✨VOILA ✨Flying Splits.
🧘♀️ Want more support building your Flying Splits?
Inside The Recipe, my online yoga studio, you’ll find a Flying Splits-focused class that walks you through this pose (and classes with other arm balances!) in real time, with guidance, modifications, and strength-building to help you feel confident from the inside out. It’s all there waiting for you whenever you’re ready to fly. 🤍
Remember, it’s okay to come down and try again — each attempt builds your strength and confidence!
YOUR FLYING SPLITS JOURNEY STARTS NOW!
If you made it this far, I hope you’re feeling empowered, supported, and maybe even a little excited to explore this shape. Flying Splits can feel humbling, playful, and wildly rewarding all at once; like anything meaningful in yoga, it unfolds with time and practice.
You don’t need to be perfect to begin. You just need a bit of curiosity, a willingness to lean forward, and the courage to try again (and again and again and agian). Whether your back leg lifts for a moment or you find yourself hovering for a few steady breaths, every attempt is part of the process and a seed that has been panting waiting to bloom. I’m so proud of you!
If you’re craving more guidance and want to keep building strength and confidence in arm balances, I’d love to support you inside The Recipe, my online yoga studio. Inside you’ll find classes that meet you exactly where you are, from skill-building flows to full programs that walk you step by step through poses just like Flying Splits and other arm balances..
✨ Now go take flight and remember, the fall is just part of the magic. You’ve got this.
xx Jess
Your recipe for strength, flexibility, breath + inner connection. Get anytime access to our growing collection of over 100 classes, ALL programs, and exclusive content. Yoga, meditation, strength + more.
Your recipe for strength, flexibility, breath + inner connection. Get anytime access to our growing collection of over 100 classes, ALL programs, and exclusive content. Yoga, meditation, strength + more.
Like this post? Pin it to save for later!
